Modifying General Host Settings
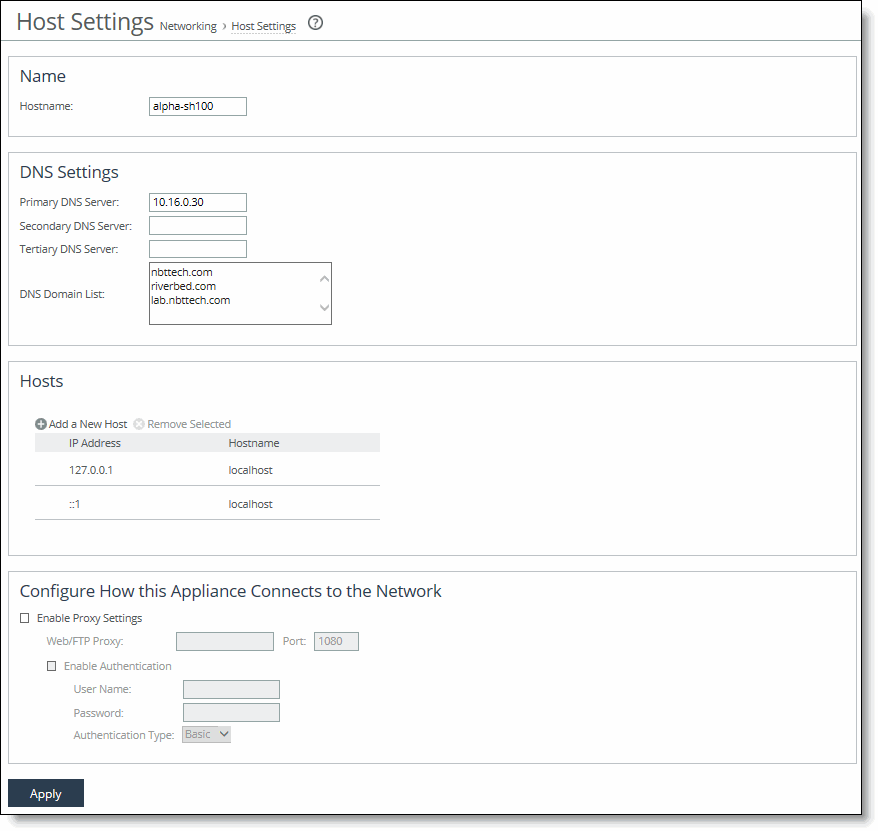
You view and modify general host settings in the Networking > Networking: Host Settings page.
When you initially ran the installation wizard, you set required network host settings for the SteelHead. Use these groups of controls in this page only if you require modifications, additional configuration, or want to verify the DNS configuration:
• Name - Modify the hostname only if your deployment requires it.
• DNS Settings - We recommend using DNS resolution.
• Hosts - If you don’t use DNS resolution, or if the host doesn’t have a DNS entry, you can create a host-IP address resolution map.
• Proxy Settings - Configure proxy addresses for web or FTP proxy access to the SteelHead.
• DNS Test - We recommend verifying your DNS configuration using this tool.
To modify general host settings
• Choose Networking > Networking: Host Settings to display the Host Settings page.
Figure: Host Settings Page

To change the hostname
1. Choose Networking > Networking: Host Settings to display the Host Settings page.
2. Under Name, change the Hostname field.
3. Click Apply to apply your changes to the running configuration.
4. Click Save to Disk to save your settings permanently.
To specify DNS settings
1. Choose Networking > Networking: Host Settings to display the Host Settings page.
2. Under DNS Settings, complete the configuration as described in this table.
Control | Description |
Primary DNS Server | Specify the IP address for the primary name server. |
Secondary DNS Server | Optionally, specify the IP address for the secondary name server. |
Tertiary DNS Server | Optionally, specify the IP address for the tertiary name server. |
DNS Domain List | Specify an ordered list of domain names. If you specify domains, the system automatically finds the appropriate domain for each of the hosts that you specify in the system. |
3. Click Apply to apply your changes to the running configuration.
4. Click Save to Disk to save your settings permanently.
To add a new host
1. Choose Networking > Networking: Host Settings to display the Host Settings page.
2. Under Hosts, click +.
3. Complete the configuration as described in this table.
Control | Description |
IP Address | Specify the IP address for the host. |
Hostname | Specify a hostname. |
Add | Adds the host. |
Remove Selected | Select the check box next to the name and click Remove Selected. |
4. Click Apply to apply your changes to the running configuration.
5. Click Save to Disk to save your settings permanently.
To enable proxy settings
1. Choose Networking > Networking: Host Settings to display the Host Settings page.
2. Under Configure How This Appliance Connects to the Network, complete the configuration as described in this table.
Control | Description |
Enable Proxy Settings | Provides proxy access to the SteelHead. Enables the SteelHead to use a proxy to contact the Riverbed licensing portal and fetch licenses in a secure environment. You can optionally require user credentials to communicate with the proxy, and you can specify the method used to authenticate and negotiate user credentials. Proxy access is disabled by default. RiOS supports these proxies: Squid, Blue Coat Proxy SG, Microsoft WebSense, and McAfee Web Gateway. |
Web/FTP Proxy | Specify the IP address for the web or FTP proxy. |
Port | Optionally, specify the port for the web or FTP proxy. The default port is 1080. |
Enable Authentication | Optionally, select to require user credentials for use with web or FTP proxy traffic. Specify the following to authenticate the users: • User Name - Specify a username. • Password - Specify a password. • Authentication Type - Select an authentication method from the drop-down list: – Basic - Authenticates user credentials by requesting a valid username and password. This is the default setting. – NTLM - Authenticates user credentials based on an authentication challenge and response. – Digest - Provides the same functionality as basic authentication; however, digest authentication improves security because the system sends the user credentials across the network as a Message Digest 5 (MD5) hash. |
3. Click Apply to apply your changes to the running configuration.
4. Click Save to Disk to save your settings permanently.
To verify the DNS settings
1. Under Domain Health Check, select Test DNS.
An abbreviated test status appears for the most recent test run: Passed, Failed, or Undetermined. The test status is blank until the initial DNS settings test.
2. Specify the fully qualified Active Directory domain in which the SteelHead is a member. Typically, this is your company domain name.
3. Click Test DNS to run the test. The Management Console dims this button until you specify the domain name.
The time and date of the last test appears after Last Run.
When the test runs, the status In Progress appears. After the test completes, the test logs and test result appear.
Viewing the Test Result
The test result can be one of the following:
• Passed
• Failed
• Undetermined - A test with an undetermined status indicates that the test couldn’t accurately determine a pass or fail test status.
To view diagnostic test logs
• Click Show logs. The number of lines in the log appear after Show logs or Hide logs.
The test logs are usually interesting only after a test fails.
An abbreviated form of the time stamp appears in the left margin of each line. To see the original, full time stamp in the form of a tooltip, hover the mouse over a time stamp. Not all log lines have time stamps, because third-party applications generate some of the logging data.
The log lines highlight errors in red and warnings in yellow.


