Configuring controller-to-SteelHead peering
You configure secure peers between the controller and the SteelHead in the Administration > SSL: Peering page.
For basic steps for configuring TLS in the controller and the SteelHead, see
Basic steps for configuring TLS.For basic steps for configuring the TLS Proxy Support feature in the controller and the SteelHead, see
Basic steps for configuring HTTPS/TLS proxy support.For details about TLS peering, see the SteelHead User Guide.
To configure TLS peering
1. Choose Administration > SSL: Peering to display the Peering page.
Peering page
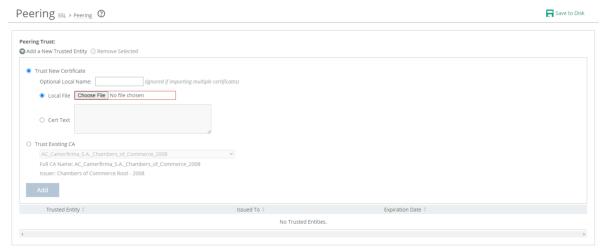
2. To add or remove a trusted entity, under Peering Trust, complete the configuration using these controls:
– Add a New Trusted Entity—Displays the controls for adding trusted entities.
– Trust Existing CA—Select an existing CA from the drop-down list.
– Trust New Certificate—Adds a new CA or peer certificate. The SteelHead supports RSA and DSA for peering trust entities.
– Optional Local Name—Optionally, specify a local name for the entity (for example, the fully qualified domain name).
– Local File—Browse to the local file.
– Cert Text—Paste the content of the certificate text file into the text box.
– Add—Adds the trusted entity (or peer) to the trusted peers list.
– Remove Selected—Select the check box next to the name and click Remove Selected.